Monday, December 11, 2017

Unsung Voices: Second Grade Monuments

This year the second grade teachers wondered about crafty a project around United States geography and introducing the students to where states are located in the country. Then the idea of monuments was floated based on the events in Charlottesville and the larger national conversation about who we as a nation choose to honor with statues. As we talked about it, there was a struggle to figure out how to introduce this topic to second graders who do not have the background knowledge or understanding about the events and systemic racism that lead to these statues. I wanted to move forward with this idea in a way that was understandable for our students. With this in mind we designed a monument project that looked at the United States and used current presidential monuments as land markers for students to have a better understanding of geography. Then we talked about the fact that many monuments are to presidents, all of whom up until 2008 were all white men and there has yet to be a female president. Then we opened up a conversation about why monuments are created and that maybe there are unsung voices and changemakers who deserve to be recognized with a national monument. This let to a project where students learned more about individuals who contributed to society and others in positive ways and then students designed a monument to those individuals for their accomplishments.

The first step was introducing the United States geography to the second graders. I started by reading them the book “How to Make a Pie and See the USA” by Marjorie Priceman. I really like this book as an intro to geography. In the story the young girl decides to make a cherry pie but the pie shop is closed so she travels around the USA to make all the materials she needs to make her pie. As we were reading the story I had marked the locations on Google Earth and we took a virtual field trip around the country to better help the students understand where states and natural landmarks are located.


During the students’ Technology time, the Tech ED teacher explored the US again using Google Earth and highlighting some well known landmarks like Mount Rushmore, the Golden Gate Bridge and the Washington Monument. She then had students explore the National Geographic Kids U.S. States website (https://kids.nationalgeographic.com/explore/states/us-states-hub/ ) so they could learn a bit more about each of the states.


In library the next week we read the very funny book “The Scrambled States of America” by Laurie Keller. I had purchased a large foam floor puzzle of the United States and scrambled them all up. Each student was given a state and we set out to put the states back in their rightful place. This again reinforced the geographic location of all the states.


In the next Tech Ed time period students were introduced to the idea of monuments and the teacher shared some of the most famous monuments are around the United States using Google Earth. Students talked about how a monument is a statue, building, or another structure that is built to commemorate a famous or notable person or event. Students explored the Lincoln Memorial, Mount Rushmore and the FDR monument in Washington DC.

In the next library time I connected with the idea of monuments again and talked to the students about why the monuments were built and they mentioned the idea of building monuments to former United States Presidents. Then I introduced students to the idea of building monuments to people who are not always recognized for their accomplishments and contributions to society. I told them that would be their challenge, to read a biography of an unsung hero and then in small groups collect research on that person to learn more about their lives. Next, they would design a monument to that person that highlighted what their contribution to society was or is. Finally, students would build a small model of their monument to share with their classmates and the rest of the school.
To start the research collection we choose narrative nonfiction books that students read in small groups. The focus was on finding books about people who were not as well known and we also focused on people of color and women, two groups that are the least represented in monuments and statues in the United States. Some of the individuals included Patricia Bath, Dolores Huerta, and Elizabeth Blackwell.

The next step was the ideate stage. We asked to students to work with their groups to think about what that person was known for and then design a monument that highlighted those achievements. We wanted the students to focus on building a monument beyond a statue of the person but to build a monument that really highlighted the achievements in their lives.


After students worked on their design plans they started building. We put out lots of different soft maker materials including cardboard, construction paper, play doh, pipe cleaners, etc. They were also introduced to Little Bits connective circuits. Little Bits are one of my favorite “hard” maker materials to use with younger students because they are simple and easy to connect and add really neat elements to a project like light, movement and sound. Students were given the opportunity to add an interactive element with Little Bits to their monument. They worked with their groups and spent about two and a half weeks building and creating their monuments. They really engaged in this project and worked to create thoughtful and imaginative monuments to the people they learned about. Students wrote up a ‘plaque” to add to their monument to tell people about their unsung hero and changemaker and also explained where in the United States they would build their monument and why.


The final step of this project was a share out of all the monuments in the library for all the second grade students and other members of the community to see! Students were so excited to share their work and talk about what they had done as well as learn about their classmates' work and the people they had studied and were celebrating.


Friday, November 17, 2017

Iggy Peck Architect & 3D design with kindergarten

I love all of the books by Andrea Beaty (https://www.andreabeaty.com/) ! The books are so fun to read and the illustrations and language grabs kids and pull them right in. One of my favorite books is “Iggy Peck Architect”. In addition to loving the book just as a great read aloud, I also love it for all the learning, projects and building that it inspires. I was inspired by the book to engage in a building project with my kindergarten students.


We started with reading the book and identifying some of the famous structures that were highlighted. We then went on a virtual field trip using Google Earth to travel to some of the famous building in the book, including the Golden Gate Bridge, Taj Mahal and the Sydney Opera House.


During our next sessions, students started with retelling the important parts of the Iggy Peck story. Then they were given the challenge to build models of some of the famous structures we visited during our Google Earth tour with Legos. Students worked in small groups at our Lego table to create some really creative models!


At the next library time students read the short book “dreaming up” by Christy Hale. The book shows buildings made with lots of unique and innovative buildings with different materials and then children building structures using similar creative materials. Students were then given their next challenge, each small group was given 50 2x2 lego squares to design their own building or structure. Students planned their buildings first and then built the structures with their lego supplies.


At the final library class, students were introduced to the 3D building app Blokify (www.blokify.com). This app was suggested by a colleague as a great one to introduce young children to 3D design. In the app you can choose just three shapes to work with including a simple block shape and then students just touch on the space they want to add the block. It was a great way for the students to be independent in their 3D building. We set the students up at several tv screens around the library and mirrored the iPad app up so everyone would be able to see the design building. Students worked together to take the design they had modeled out of legos and build it in the 3D app.


The final step was printing the students’ designs in the library’s 3D printers! I’m so excited for the students to see their final work printed out.


I really liked this project for several reasons. It included some literacy skills with reading the story and having students focus on the beginning, middle and end of the story, the characters and setting. Each week students would retell the Iggy Peck story, a skill we work on in kindergarten. Next, students were able to learn more about building and structures from around the world. We incorporated technology with the Google Earth tour and modeled use of iPads and apps for creation. Using ipads in school and curriculum for specific purpose and creation and helping students understand the difference from school work with a purpose and home ipad time that might be free play is also something we work on with younger students. Also students worked in collaborative groups. They needed to design, plan, communicate, collaborate and compromise with each other. These are skills that we are always working on and cultivating with our students. This project was also a great way to introduce design, ideating and also reworking and redesigning. Students were faced with some challenges in their design plans that did not work out and then had to go back and revisit and rework their ideas. The challenge of rethinking and trying something new are also skills that we are always working on with students.

Monday, October 23, 2017

Dot Day 2017: How We Make Our Mark as Collaborators

Dot Day is one of my favorite projects of the year. Not only is the book “The Dot” by Peter Reynolds a great book that students love, the story sparks so many great conversations with students and projects. For the past two years I have used the book as a jumping off point to lead a discussion about art, making our marks, how we make marks on other people’s hearts, and a discussion about collaboration and working as a community. Last year the culminating project was making art robots. (Here is a link to blog posts about that project http://thereimaginedlibrary.blogspot.com/2016/09/deeper-connections-with-dot-day.html).
After reflecting on last year’s project and some of the limitations of small hands and making some of the parts of the art robots, I decided to try a new art building project, building cardboard manual art machines.


The format of the project started the same as it has in the past. We began by reading the book “The Dot” and having the students map the beginning, middle and end of the book.

Next, we looked at the character of Vashti. Students were asked to brainstorm words they would use to describe Vashti at the beginning of the story and words to describe her at the end of the story.

Then, students brainstormed different ways that they made their mark with art and what materials they used to make art.

The next step was having students think about different ways that they made their mark on other people’s hearts. We talked about how we treat people and interact with them can leave positive marks on other people’s hearts. Students brainstormed all the different positive ways they interact with people including inviting people to play on the playground, helping a classmate to the nurse or holding the door open for classmates.

Building on the focus of positive ways students interact with classmates, the final step was asking students to think about a time that they made or built something with someone else and it was a good experience. I asked students to really think about what made that collaboration a positive experience. We documented all of their thoughts and then sorted them into similar themes. This process gave the students five characteristics or qualities of a collaborator. The five that the students came up with were: Listen, Share ideas, Everyone agrees, Everyone has a part, and Everyone is kind.


The next step in the process was to test their collaboration qualities. Students were put in small groups and asked to set the norms for their group to make sure that they use all the qualities of a collaborator. Each group set the rules and ways they were going to make sure that they would follow the qualities. I made sure to emphasis that these were going to be referenced throughout the process and if they needed to resolve a conflict they would need to look at their norms to help. Once groups set their norms, it was time to ideate.


Students were shown the materials that they could use to build their art machines including cardboard, wooden rods, duct tape, squirt bottles, paint and string. Groups then designed their art machines. They drew out their plans and then started building their machines. Groups used their norms to make sure that all students ideas would be included and that they worked together to make their machine.


Students started building!


The next step was the testing phase. Students filled one squirt bottle up with paint and tested their machine on a test sheet of paper. Many of the students had to think and rethink some of their designs when their first test did not work.

After reworking and rethinking their designs they tested again and then were ready for their final painting. Students used artist canvas to make their final collaborative piece of artwork. Each member of the group signed their artwork, just like Vashti did in “The Dot.” All of the student artwork will be shared in an art gallery show, just like Vashti in the book.


A new part of this project that I added this year was a reflection piece. I asked three prompt questions to get students talking about their process and any challenges that happened. I also asked them which of the collaborator qualities that they thought was most important in the process. I wanted to see what the students were thinking during this process and if they were making deeper connections with the work in ways that I hoped they would. Many of the reflections were very thoughtful about the work that they did and what was important to them and what they really got out of the process.


The plan is for the rest of the school year to have the collaborator qualities displayed in the library and in their classroom as students work together so they can reference them as they are working as collaborators.

Tuesday, October 10, 2017

Mix It Up Part 2: With Alexander Calder

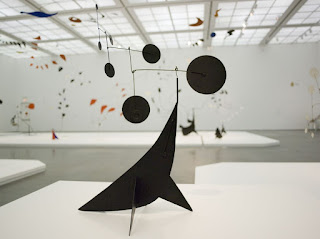
The next step of this Mix It Up project was to learn about artist Alexander Calder. Calder is an amazing artist and he is the originator of the mobile. To introduce Calder we read the book Sandy’s Circus: A Story About Alexander Calder by Tanya Lee Stone. This is a great book about Calder’s life and the creation of the miniature circus, a series of figures including a lion and trapeze artists out of wire and other materials. The book is very colorful and the story is engaging for preschoolers to follow. I did add some details and explanation about topics in the book to make it more accessible for my Junior Kindergarteners.


Next, I shared images of Alexander Calder’s work including his circus wire structures. Then, I shared some pictures of Alexander’s work that have a connection to Chicago, his Flamingo sculpture is a famous work of art known to many Chicago residents. Many of my students were familiar with the piece and had seen it on trips in the Loop. I also shared some of Calder’s famous mobile works that have been on display at Chicago’s Museum of Contemporary Art and the Art Institute.


I shared with students that Calder’s mobiles will be the inspiration for the piece of art that they are going to create using the materials they had painted with the colors they had created.


During our next class students will decide on the shape that they want to cut their pieces into and how we want to layout our mobile!